
Managing infrastructure costs can be a game changer for your business, but a clean sweep takes time—from identifying the best tools to use, calculating product cost efficiencies, and figuring out how to configure new tech—it can feel overwhelming. But it’s worth it.
Most companies have migrated from using on-site server setups to the cloud. It is a common mistake to overlook cloud costs, including tools that supplement software development and maintenance because they add up quickly upon usage. Engineers often find themselves surprised by the cloud hosting bill and end up paying for more than they actually use. Typically, quick fixes are performed, like deleting logs and shutting down instances, but researching services for a long-term solution can be daunting.
This guide will help you understand how to identify the cost of your existing infrastructure, prioritize services for optimization, and how to implement it on specific configurations in the cloud based on best practices from our cost optimization journey. This article only covers saving recommendations for Google Cloud Platform (GCP), our cloud platform of choice and LiveRamp’s strategic partner wherein it hosts LiveRamp products, services and customer data.
Cost optimization best practices can also be applied to other cloud providers since GCP products have corresponding solutions with other popular cloud providers in the market.
Step 1: Enable cost visibility
Use cost reporting tools
There are a couple of useful tools that can help assess the current costs of your cloud infrastructure. Knowing where most of the cost comes from helps prioritize which areas to focus on first. We’ll share a prioritization framework later in the article to help assess cost optimization in a practical way.
GCP Billing
Navigating the GCP Billing report is straightforward. Simply filter what you wish to see in the billing report by specifying the duration date, project, service, and SKU. As a best practice and to examine the report in detail, toggle the “Invoice Month,” select the specific GCP project and take note of the top five services that incur the highest cost—and focus on optimizing those. List the total cost for that time period for future analysis.

Figure 1: GCP Billing Reports View for a specific project
Read more: View your billing reports and cost trends
GCP Recommendation Hub
In the GCP console, you can select a specific project and directly navigate to this link. Once accessed, navigate to the Recommendations tab. This is simple to follow because the recommendations UI lists the specific resource to optimize for your project. Once selected, it will guide you step-by-step on how to implement the cost optimization. Here is an example where GCP recommended changing the VM type for the selected project:
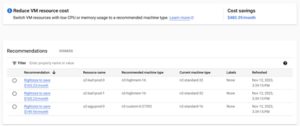
Figure 2: GCP Recommendations for VM usage
From here, you can see how much the total cost savings will be and how to proceed with implementation after the recommended item is selected, based on its CPU utilization from this example:
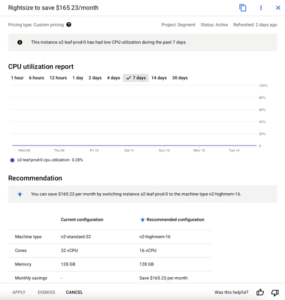
Figure 3: Recommendations based on CPU utilization
Be sure to review all recommendations before applying them—the changes may cause downtime or delete important resources. It is still up to the GCP project users to assess whether the recommendation is useful or not. The cost saving implementation differs across GCP products of course, but this is a good starting point to reduce some costs quickly by using a reliable tool in the console.
Read more: Finding and applying recommendations using the Recommendation Hub
KubeCost
If your infrastructure uses kubernetes for orchestration, installing KubeCost can be useful for assessing detailed costs, along with savings recommendations. LiveRamp’s current setup uses Helm and Terraform to install new tools, OpenTelemetry for observability and Grafana for visualization. Here is the infrastructure setup:
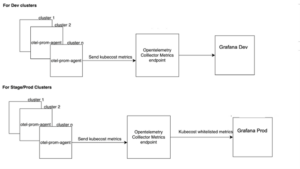
Figure 4: KubeCost infrastructure setup
Once installed, access the specific kubernetes cluster to view the reports in the UI. We executed a port-forwarding command to access the UI on the localhost and its port.
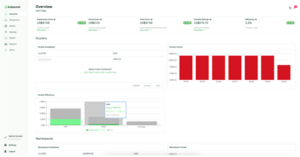
Figure 5: KubeCost UI – Overview page
Here is a sample of the resource recommendations and estimated savings for a cluster:
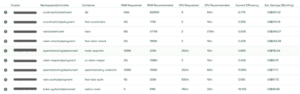
Figure 6: KubeCost savings recommendation for each resource in a cluster
Navigating the KubeCost UI is straightforward. There is both an overview and a granular cost report for each resource residing on the cluster, as well as savings recommendations. This will give data-backed evidence to identify which resource to focus your cost optimization efforts on.
Read more: Kubecost Documentation
Measurement and Prioritization
During cost optimization efforts, our team created an analysis document to summarize findings from the cost reporting tools for each engineering team and came up with the following:
- GCP project and the clusters concerned for each environment
- Top five most expensive services from the Billing console
- GCP recommendations from the Recommendation Hub
- KubeCost report and savings recommendations
- Total monthly cost, forecasted cost and savings goal
Since there are numerous teams, we prioritized the top 10 most expensive projects with a goal of saving at least 10% monthly overall. It is important to scope your cost optimization activity and set a goal so that the savings can be measured. Visualizations and alerts can also help in cost optimization governance. You can generate a dashboard for each GCP project and its services, and create alerts for when a certain spending threshold is met. Since we use Grafana as our visualization tool, we leveraged KubeCost metrics to calculate costs.
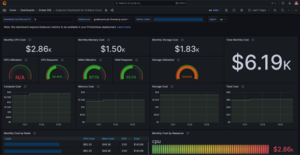
Figure 7: KubeCost metrics in Grafana dashboard
After you’ve gathered information on which services are incurring the highest cost and how to measure them, you will most likely have a huge backlog of tasks to implement these recommendations. At this point, your team should prioritize which recommendations to tackle first.
Cost optimization can be a tricky activity because it can be repetitive; even though several resources have been deleted or shut down, they might still reappear depending on its demand or usage. Keep in mind that cost should not be the only factor—the effort, risk, and impact of the suggested changes is important as well. This is a common guide, called an effort and cost impact matrix, that will help you to prioritize cost optimization tasks:
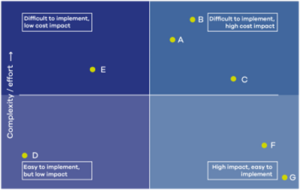
Figure 8: Categorize tasks based on complexity and effort
After categorizing, it is better to focus on the right side quadrants since these activities have a higher cost impact. The low impact ones can be done on the latter part or if there is extra team capacity.
Step 2: Adjust your infrastructure by applying cost optimization best practices
Now that we’re aware of the cloud costs incurred, we can identify which parts of the cloud infrastructure should be optimized and how. This list is not exhaustive, but it covers the generic items that incur costs and are typically used in a cloud infrastructure setup. It also suggests a few recommendations on how to save from using these resources.
Storage
Cleaning up storage
Storage is typically overlooked in an infrastructure setup, but can be costly if not managed appropriately. Simply cleaning unused files and buckets can help you save considerably. You can clean up the following as a starting point:
- Remove temporary files such as old deployment artifacts, unused assets and test files
- Delete old and unmounted volumes in virtual machines and unnecessary snapshots
- Review buckets and bucket objects, identify which ones to delete, update availability settings, and configure lifecycle on
- Review the buckets’ location if it should be hosted on a single region or multiple regions
Setting up bucket lifecycle
It is recommended to configure buckets and their objects under an appropriate storage class based on your needs. For example, backup files are less frequently accessed, so it can be stored in an archival storage class. This can generate a good amount of savings especially if there is a huge volume of buckets in your cloud infrastructure. Additionally, you can opt to automate the buckets’ object lifecycle by following these steps:
- In the Google Cloud console, go to the Cloud Storage Buckets page.
- Select the bucket you wish to configure and click the Lifecycle tab
- Add a rule and specify a configuration
- From the configuration page, you can select the appropriate action and conditions
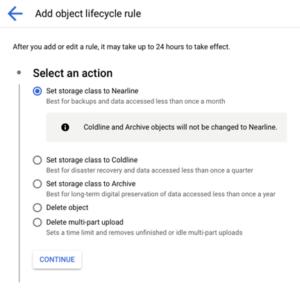
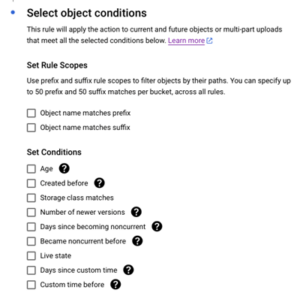
Figure 9: Setting lifecycle rules in a bucket object
VMs
Leverage usage discounts
GCP discounts can help you significantly reduce your cloud spending depending on your VM usage patterns. There are two types of discounts that GCP offers:
- Committed-use discounts: You can commit to a one or three-year term for a specific amount of vCPU and memory usage in a particular region. In return, they receive a significant discount compared to the pay-as-you-go pricing.
- Sustained-use discounts: GCP provides sustained use discounts for instances that run continuously in a month. The discount automatically applies to instances running for a significant portion of the billing month.
Use appropriate compute types
Choosing the correct VM type affects cost, especially if these resources are running for a long period of time, or are being used on a huge scale. Here are some key considerations to help you choose the correct GCP compute type:
- Workload Requirements: Understand the requirements of your workload since they might have varying demands in terms of CPU, memory, and storage. For example, a compute-intensive application may benefit from instances with higher CPU resources, while a memory-intensive application may require instances with more RAM.
- Instance Families: GCP offers different families of instances optimized for specific use cases. Common families include general-purpose (e.g., N1), memory-optimized (e.g., M1), and compute-optimized (e.g., C2) instances. Choose the family that aligns with your workload characteristics.
- Storage Requirements: Consider the storage needs of your application. GCP provides various storage options, including standard persistent disks, SSDs, and local SSDs. Choose the appropriate storage type based on your performance and capacity requirements.
- Networking: Evaluate the networking capabilities required for your workload. GCP offers instances with different levels of network performance. Ensure that the selected instance type meets your network bandwidth and latency requirements.
- Lifecycle Considerations: Determine the lifecycle characteristics of your workload. For short-lived, fault-tolerant, or batch processing workloads, preemptible instances may be cost-effective. For long-running, mission-critical workloads, standard or committed use instances may be more suitable.
Shut down unused VMs
Shutting down unused virtual machines (VMs) in GCP is a good practice to optimize costs and resource utilization. Here are some approaches and specific steps for automating this:
- Use Cloud Scheduler and Cloud Functions:
-
- Create a Cloud Function that stops VMs. The function should use the google-cloud-sdk library to stop VM instances.
- Create a Cloud Scheduler job that triggers the Cloud Function at scheduled intervals.
- Use instance groups and autohealing:
-
- Create an instance group for your VMs.
- Configure an autoscaler for the instance group with a target utilization or scheduled scaling policy.
- The autoscaler can automatically adjust the number of instances based on demand, shutting down instances when they are not needed.
- Use Identity and Access Management (IAM):
-
- Set up a service account with the necessary permissions to stop VM instances.
- Use this service account to create a script or program that periodically checks for idle VMs and stops them.
- You can run this script using a service like Cloud Scheduler.
Kubernetes clusters
Scale down during off-peak hours or low activity
Google Kubernetes Engine (GKE) allows you to scale your clusters based on the demand of your workload. Scaling down during off-peak hours or low activity is a cost-saving strategy that involves adjusting the number of nodes in your GKE cluster to match the current resource requirements. Here are some best practices on how you can achieve this:
Autoscaling
GKE provides auto scaling options to automatically adjust the number of nodes in a node pool based on the resource requirements of your workloads. You may use either:
Node Pool Autoscaler: When creating or updating a node pool, you can enable the node pool autoscaler. This allows GKE to automatically adjust the number of nodes in the pool based on the resource utilization of your pods:

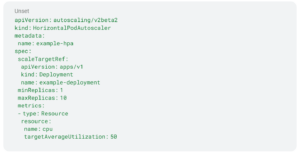
Horizontal Pod Autoscaler (HPA): Use Kubernetes Horizontal Pod Autoscaler to automatically adjust the number of pod replicas based on observed CPU or memory utilization:
Scheduling Scaling Activities: You can schedule scaling activities using tools like Google Cloud Scheduler or Kubernetes CronJobs to automate scaling actions during specific times.
Remember to carefully consider the impact of scaling down on your workloads. Ensure that your applications can gracefully handle node terminations and that critical services are not adversely affected.
Resize compute requests
Another main activity that we did during our cost optimization initiative was to resize the kubernetes resource requests. This is a low-effort, high-impact activity because you will save over time, just by updating the resource. Resizing Kubernetes resource requests involves adjusting the amount of CPU and memory that your containerized applications request from the Kubernetes cluster. Resource requests are specified in the resource section of a Kubernetes Pod’s manifest. Here’s how you can resize resource requests:
1. Edit the Pod specification:
- Open the YAML file that defines your Pod or Deployment configuration.
- Locate the “resources” section within the container specification. It might look something like this:
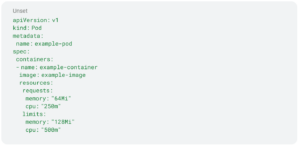
In this example, the resources section includes both requests (minimum required resources) and limits (maximum allowed resources).
2. Adjust resource requests: Modify the values for memory and CPU based on your requirements:
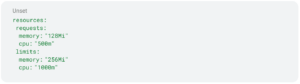
Typically, we would change the resources based on the KubeCost recommendations, but it’s still better to review them based on your actual usage.
3. Apply and verify the changes:
- Save the changes to the YAML file. Apply the changes to your Kubernetes cluster. Use “kubectl apply” with the updated YAML file:

- After applying the changes, verify that the Pod is running and that the resource requests have been updated:

Logs
Cloud logging
Reducing cloud logging costs in GCP can be achieved through various strategies that involve optimizing the amount of data ingested, stored, and processed by Cloud Logging. Here are some recommendations to help you minimize logging costs, which can be applicable to other logging tools as well:
Log exclusion filters: Define log exclusion filters to prevent certain logs from being ingested. This can be useful for excluding noisy or less critical logs that are not necessary for analysis or monitoring.
Log sink filters: When exporting logs to external systems or BigQuery, use log sink filters to export only the relevant logs. This can help reduce the volume of logs processed by the export destination.
Log severity levels: Adjust the logging severity levels to focus on capturing only the most critical logs. This can be configured in your application or logging configuration to limit the generation of less important logs.
Sampling and rate limiting: Use sampling or rate-limiting mechanisms to reduce the number of logs sent to Cloud Logging. This is particularly useful for high-traffic applications where not every log entry needs to be captured.
Log entry size: Be mindful of the size of your log entries. Large log entries consume more storage and incur higher costs. Consider optimizing your application’s log messages to be concise and informative.
Retention period: Adjust the retention period for logs based on your compliance and analysis needs. Retaining logs for a shorter duration can help reduce storage costs. A rule of thumb is to set a 30-to 90-day retention period.
Log exports to external systems: Review the destinations or tools where you export logs from GCP or your cloud provider. Exporting logs to external systems or services might incur additional costs. Evaluate whether all exports are necessary and adjust accordingly. Some logging tools may also be redundant and can incur unwanted costs.
Use of labels and metadata: Leverage labels and metadata efficiently. This can help you organize logs and filter them more effectively. Avoid unnecessary duplication of information in log entries. This can also help in log indexing for better performance.
Cloud Logging pricing tiers: Check the Cloud Logging pricing tiers to understand the costs associated with different levels of log retention and analysis. Choose the tier that aligns with your needs and budget and apply it accordingly.
Regular review and cleanup: Periodically review your logging configurations and settings. Remove any unnecessary log entries, exports, or configurations that may contribute to unnecessary costs.
Use appropriate storage class: Evaluate the storage class options for Cloud Logging. Coldline or Nearline storage classes may offer lower costs for logs that are not frequently accessed.
Implementing a combination of these strategies can help you optimize your cloud logging costs in GCP. Regular monitoring and adjustment based on your evolving needs will contribute to better cost efficiency.
Step 3: Results, recommendations, and a cost-effective mindset
Benchmark your results
As mentioned previously, we aimed for a collective 10% savings across the top 10 spending GCP projects. We implemented the following steps for each project as a way to benchmark the cost optimization results:
- In GCP Billing, get the current month’s cost report
- Provide a forecasted savings value which is 10% of the total cost. This may vary depending on your organization’s goal as long as the target is realistic.
- Apply cost-saving measures within the infrastructure as outlined in step 2
- Measure the cost for each month using GCP Billing report (we performed cost optimization for 3 months)
- Get the final cost once all changes have been applied
We used this format to have better visibility into the results using one of our projects as an example:
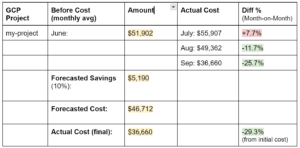
Optionally, you can enumerate savings on specific cloud services, but we opted to list the total costs monthly for the whole project. Note that the costs may fluctuate, as seen in July, due to increased engineering activity. It is important to communicate with your teams so costs are reflective of the usage with the cost optimization initiatives.
As seen above, the actual cost was even less than the 10% that was forecasted for savings, which was actually 29.3%. We applied numerous cost-saving measures, such as kubernetes resource request adjustments, compute resizing, and storage and VM cleanups.
Cultivate a cost-effective mindset
Implementing cost optimization is only the first step to saving. Maintaining lower costs should be a long-term commitment and must be a collaborative effort between engineering and management teams. These activities should not be limited to a technical checklist, but it should be part of the culture to cultivate a cost-effective mindset across your organization. After this initiative, our engineering team learned to keep in mind other factors that are equally important:
- “More” doesn’t always mean better: As engineers, we often get excited about new tools coming out of the market; but sometimes, multiple tools solve the same problem. Reviewing the toolset that you currently have might reveal some redundancies which could reduce your costs when minimized. Additionally, it is key to assess new tools thoroughly based on your need, the cost of migration, and its risks and benefits.
- Be mindful of resource allocation during code reviews: This might seem trivial, but there is actually a cost impact in the codebase, especially when provisioning infrastructure. For example, reviewing kubernetes resource requests should only have a sufficient amount of CPU and memory; or creating storage buckets should have an appropriate type defined, depending on its need. These simple checks would greatly affect long-term costs and must be kept in mind during code reviews.
- Communicate and raise concerns: This is crucial to any organization because setting up tools and processes can only do so much. Communicating concerns when teams are spending more than necessary or sharing cost-saving ideas can help manage costs.
Further recommendations for improving cloud cost optimizations
There are a few more items not discussed in this article that we highly recommend for improving cost optimizations:
- Set up cost monitoring: This is a great long-term solution to manage costs by creating budget thresholds and alerting teams when they are overspending. Be as granular as possible so that engineering teams can easily view which specific resource/s are causing the alert. Any monitoring solution like Datadog, Grafana or your organization’s existing observability stack can be leveraged for setting up cost management monitoring. Engage with your management and finance teams to understand the budget averages or thresholds that are appropriate for your team.
- Event-driven autoscaling: Albeit technical, extending your autoscaling mechanism to an event-driven manner would greatly save costs. For instance, you have a retail company which manages a website where users can shop items. There are instances where you can set up autoscaling when there are specific application metrics, such as number of users per hour, to increase your infrastructure capacity. Then, lower it down when the traffic is low. Scheduled or resource-based triggers can be quite limited in special cases. Tools like KEDA can be useful in this scenario if you are using kubernetes.
- Periodically review costs and increase visibility: In addition to cost monitoring, this can be introduced as a team process or within the engineering team as a whole to periodically review costs and whether they truly reflect activities. Cost reports should be readily available and visible to everyone to create accountability and transparency. This review can be done monthly or quarterly depending on your organization’s needs.
It can feel daunting to tackle cost savings, especially for larger organizations with a huge volume of cloud resources; but implementing changes gradually by enabling cost visibility reports, adjusting your infrastructure, and cultivating a cost-effective mindset can make a huge impact in reducing costs in the long run.
For cost visibility, there are various tools available such as GCP Billing, GCP Recommendations Hub and KubeCost. Similar offerings from other cloud providers can be utilized as well, depending on your cloud infrastructure setup. When adjusting your infrastructure, focus on top spending cloud services such as VMs, kubernetes resources and storage resources. Lastly, it is equally important to cultivate a cost-effective mindset by communicating within the organization, properly reviewing new and existing tools and cloud services and being thorough with code reviews especially when provisioning infrastructure.
Additionally, setting up cost monitoring, event-driven autoscaling, and periodical cost reviews are recommended to improve the cost optimization process as a whole. Huge initiatives like this require collaboration and shared responsibility, but it is worth it—and so are the business benefits of being a cost-efficient organization.